Foodie’s Markets distinctive, diverse,
and delicious foods.
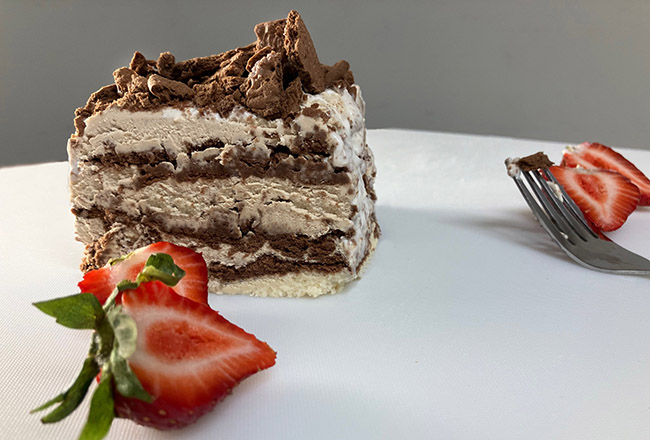

Chocolate~Wafer~Mocha~Cream Ice~Box Cake by Foodie’s Chef Laura Brennan
November 23, 2022
It may be a mouthful to say but trust me it will be a very delicious mouthful to eat. This is a no-bake cake made with crumbled chocolate wafer cookies layered with
coffee-flavored and sweetened whipped cream. It’s super simple to make. The longest part of the recipe is waiting 16-20 hours for the cookies to absorb the cream and
become: CAKE!
(I used GOYA brand ‘Chocolate Maria Cookies and FYI, “Icebox” is an old-fashioned moniker for: “refrigerator”…from a time when food was chilled in a free-standing
insulated box using giant blocks of ice, that were delivered to the house by the “Iceman”.
Ingredients
2 each 7-ounce packages of GOYA chocolate Maria cookies OR other chocolate wafers of your choice (homemade or Nabisco Chocolate Wafers, if you can find them!)
2 ½ cups heavy cream
½ cup less 1 tablespoon powdered sugar, sifted
Pinch kosher salt
½ teaspoon ground cinnamon or for the more adventurous palate: ½ teaspoon ground cardamon seed
1 teaspoon vanilla extract
1 to ½ teaspoons instant coffee granules or espresso powder, (If using instant coffee
granules, grind them to a powder with the back of a spoon or use a mortar & pestle.)
Directions
Prepare the loaf pan. Coat a 8.5-inch by 5.5-inch loaf pan lightly with pan spray. Cover the bottom and sides of the pan with plastic wrap, leaving a long overlap on both ‘long’ sides. (Sometimes it is less cumbersome to line the pan with 2 separate pieces of plastic wrap, overlapping them in the bottom of the pan.)
Whip and season the cream. Add the 2 cups of heavy cream to a chilled bowl and add the sifted confectioner’s sugar, the ground cinnamon or cardamon, the salt, the vanilla extract and whip on low speed to combine ingredients. Increase speed to medium and whip until cream has thickened and holds its shape. Don’t over whip or it
could turn to butter-delicious butter, but not usable in this recipe! Cover and refrigerate the whipped cream.
Crush the cookies. To make this task a little less messy: add 1 package of (unwrapped) cookies to a gallon-sized plastic zip-lock bag. Seal the bag. GENTLY
crush the cookies with a rolling pin. Don’t pulverize completely. Aim for an equal mixture of pieces, chunks and crumbles. Empty the bag into a bowl and repeat
procedure with the second package of cookies.
Assemble the cake. Set aside 1/3rd cup of the cookie-crumbles and 1/3rd cup of whipped cream to garnish the finished cake after it has set. (Cover the cookie crumbles and set aside, do not refrigerate. But do cover and refrigerate the whipped cream that
you set aside.
Visually divide the remaining cream and cookie-crumbles into 4 portions. Begin by adding about 3-4 tablespoons of whipped cream to the bottom of the plastic-lined loaf
pan. Smooth out into an even layer, using a small off-set spatula or the back of a spoon. Aim for about ½-inch-even layer of whipped cream.
Next gently spoon the cookie-crumbles on top of the cream. Go slowly, ensuring that the cookie-crumbles sit on top of the cream in an even ½-inch layer. Build 4-5 layers in total, ending with cookie-crumbles. Completely wrap in the plastic and refrigerate for 16-20 hours. The cookies will be absorbed into the cream and create a distinct
chocolate layer as well as a distinct cream layer. Try to chill the cake for at least 15-16 hours so the layers will be firmer, more distinct and easier to slice.
To Serve: Remove +/or fold back the plastic wrap from the top of the loaf pan. Set your serving plate on top of the loaf pan and turn the plate and loaf pan over onto the counter. Gently lift the loaf pan from the cake. Remove all the plastic wrap. Spoon the reserved whipped cream on the top of the cake and garnish the top of the cake with some of the reserved cookie-crumbles.
To serve: Cut into slices, top to bottom, revealing a layered cake.
Serves: Makes 6-8 slices/portions
Prep and Assembly Time: 50-60 minutes
Refrigerator Chill Time: 16-20 hours
Signup for our newsletter
South End Boston
1421 Washington St, Boston, MA 02118
P: (617) 266-9911
F: 617) 266-9923
South Boston
230 West Broadway, Boston 02127
P: 617-269-4700
F: 617-269-4710
© 2026 • Foodies Markets • All Rights Reserved • Developed by Webstudio Boston
Chocolate~Wafer~Mocha~Cream Ice~Box Cake by Foodie’s Chef Laura Brennan
August 12, 2022
It may be a mouthful to say but trust me it will be a very delicious mouthful to eat. This is a no-bake cake made with crumbled chocolate wafer cookies layered with
coffee-flavored and sweetened whipped cream. It’s super simple to make. The longest part of the recipe is waiting 16-20 hours for the cookies to absorb the cream and
become: CAKE!
(I used GOYA brand ‘Chocolate Maria Cookies and FYI, “Icebox” is an old-fashioned moniker for: “refrigerator”…from a time when food was chilled in a free-standing
insulated box using giant blocks of ice, that were delivered to the house by the “Iceman”.
Ingredients
2 each 7-ounce packages of GOYA chocolate Maria cookies OR other chocolate wafers of your choice (homemade or Nabisco Chocolate Wafers, if you can find them!)
2 ½ cups heavy cream
½ cup less 1 tablespoon powdered sugar, sifted
Pinch kosher salt
½ teaspoon ground cinnamon or for the more adventurous palate: ½ teaspoon ground cardamon seed
1 teaspoon vanilla extract
1 to ½ teaspoons instant coffee granules or espresso powder, (If using instant coffee
granules, grind them to a powder with the back of a spoon or use a mortar & pestle.)
Directions
Prepare the loaf pan. Coat a 8.5-inch by 5.5-inch loaf pan lightly with pan spray. Cover the bottom and sides of the pan with plastic wrap, leaving a long overlap on both ‘long’ sides. (Sometimes it is less cumbersome to line the pan with 2 separate pieces of plastic wrap, overlapping them in the bottom of the pan.)
Whip and season the cream. Add the 2 cups of heavy cream to a chilled bowl and add the sifted confectioner’s sugar, the ground cinnamon or cardamon, the salt, the vanilla extract and whip on low speed to combine ingredients. Increase speed to medium and whip until cream has thickened and holds its shape. Don’t over whip or it
could turn to butter-delicious butter, but not usable in this recipe! Cover and refrigerate the whipped cream.
Crush the cookies. To make this task a little less messy: add 1 package of (unwrapped) cookies to a gallon-sized plastic zip-lock bag. Seal the bag. GENTLY
crush the cookies with a rolling pin. Don’t pulverize completely. Aim for an equal mixture of pieces, chunks and crumbles. Empty the bag into a bowl and repeat
procedure with the second package of cookies.
Assemble the cake. Set aside 1/3rd cup of the cookie-crumbles and 1/3rd cup of whipped cream to garnish the finished cake after it has set. (Cover the cookie crumbles and set aside, do not refrigerate. But do cover and refrigerate the whipped cream that
you set aside.
Visually divide the remaining cream and cookie-crumbles into 4 portions. Begin by adding about 3-4 tablespoons of whipped cream to the bottom of the plastic-lined loaf
pan. Smooth out into an even layer, using a small off-set spatula or the back of a spoon. Aim for about ½-inch-even layer of whipped cream.
Next gently spoon the cookie-crumbles on top of the cream. Go slowly, ensuring that the cookie-crumbles sit on top of the cream in an even ½-inch layer. Build 4-5 layers in total, ending with cookie-crumbles. Completely wrap in the plastic and refrigerate for 16-20 hours. The cookies will be absorbed into the cream and create a distinct
chocolate layer as well as a distinct cream layer. Try to chill the cake for at least 15-16 hours so the layers will be firmer, more distinct and easier to slice.
To Serve: Remove +/or fold back the plastic wrap from the top of the loaf pan. Set your serving plate on top of the loaf pan and turn the plate and loaf pan over onto the counter. Gently lift the loaf pan from the cake. Remove all the plastic wrap. Spoon the reserved whipped cream on the top of the cake and garnish the top of the cake with some of the reserved cookie-crumbles.
To serve: Cut into slices, top to bottom, revealing a layered cake.
Serves: Makes 6-8 slices/portions
Prep and Assembly Time: 50-60 minutes
Refrigerator Chill Time: 16-20 hours
Chocolate~Wafer~Mocha~Cream Ice~Box Cake by Foodie’s Chef Laura Brennan
August 2, 2019
It may be a mouthful to say but trust me it will be a very delicious mouthful to eat. This is a no-bake cake made with crumbled chocolate wafer cookies layered with
coffee-flavored and sweetened whipped cream. It’s super simple to make. The longest part of the recipe is waiting 16-20 hours for the cookies to absorb the cream and
become: CAKE!
(I used GOYA brand ‘Chocolate Maria Cookies and FYI, “Icebox” is an old-fashioned moniker for: “refrigerator”…from a time when food was chilled in a free-standing
insulated box using giant blocks of ice, that were delivered to the house by the “Iceman”.
Ingredients
2 each 7-ounce packages of GOYA chocolate Maria cookies OR other chocolate wafers of your choice (homemade or Nabisco Chocolate Wafers, if you can find them!)
2 ½ cups heavy cream
½ cup less 1 tablespoon powdered sugar, sifted
Pinch kosher salt
½ teaspoon ground cinnamon or for the more adventurous palate: ½ teaspoon ground cardamon seed
1 teaspoon vanilla extract
1 to ½ teaspoons instant coffee granules or espresso powder, (If using instant coffee
granules, grind them to a powder with the back of a spoon or use a mortar & pestle.)
Directions
Prepare the loaf pan. Coat a 8.5-inch by 5.5-inch loaf pan lightly with pan spray. Cover the bottom and sides of the pan with plastic wrap, leaving a long overlap on both ‘long’ sides. (Sometimes it is less cumbersome to line the pan with 2 separate pieces of plastic wrap, overlapping them in the bottom of the pan.)
Whip and season the cream. Add the 2 cups of heavy cream to a chilled bowl and add the sifted confectioner’s sugar, the ground cinnamon or cardamon, the salt, the vanilla extract and whip on low speed to combine ingredients. Increase speed to medium and whip until cream has thickened and holds its shape. Don’t over whip or it
could turn to butter-delicious butter, but not usable in this recipe! Cover and refrigerate the whipped cream.
Crush the cookies. To make this task a little less messy: add 1 package of (unwrapped) cookies to a gallon-sized plastic zip-lock bag. Seal the bag. GENTLY
crush the cookies with a rolling pin. Don’t pulverize completely. Aim for an equal mixture of pieces, chunks and crumbles. Empty the bag into a bowl and repeat
procedure with the second package of cookies.
Assemble the cake. Set aside 1/3rd cup of the cookie-crumbles and 1/3rd cup of whipped cream to garnish the finished cake after it has set. (Cover the cookie crumbles and set aside, do not refrigerate. But do cover and refrigerate the whipped cream that
you set aside.
Visually divide the remaining cream and cookie-crumbles into 4 portions. Begin by adding about 3-4 tablespoons of whipped cream to the bottom of the plastic-lined loaf
pan. Smooth out into an even layer, using a small off-set spatula or the back of a spoon. Aim for about ½-inch-even layer of whipped cream.
Next gently spoon the cookie-crumbles on top of the cream. Go slowly, ensuring that the cookie-crumbles sit on top of the cream in an even ½-inch layer. Build 4-5 layers in total, ending with cookie-crumbles. Completely wrap in the plastic and refrigerate for 16-20 hours. The cookies will be absorbed into the cream and create a distinct
chocolate layer as well as a distinct cream layer. Try to chill the cake for at least 15-16 hours so the layers will be firmer, more distinct and easier to slice.
To Serve: Remove +/or fold back the plastic wrap from the top of the loaf pan. Set your serving plate on top of the loaf pan and turn the plate and loaf pan over onto the counter. Gently lift the loaf pan from the cake. Remove all the plastic wrap. Spoon the reserved whipped cream on the top of the cake and garnish the top of the cake with some of the reserved cookie-crumbles.
To serve: Cut into slices, top to bottom, revealing a layered cake.
Serves: Makes 6-8 slices/portions
Prep and Assembly Time: 50-60 minutes
Refrigerator Chill Time: 16-20 hours
Chocolate~Wafer~Mocha~Cream Ice~Box Cake by Foodie’s Chef Laura Brennan
July 25, 2019
It may be a mouthful to say but trust me it will be a very delicious mouthful to eat. This is a no-bake cake made with crumbled chocolate wafer cookies layered with
coffee-flavored and sweetened whipped cream. It’s super simple to make. The longest part of the recipe is waiting 16-20 hours for the cookies to absorb the cream and
become: CAKE!
(I used GOYA brand ‘Chocolate Maria Cookies and FYI, “Icebox” is an old-fashioned moniker for: “refrigerator”…from a time when food was chilled in a free-standing
insulated box using giant blocks of ice, that were delivered to the house by the “Iceman”.
Ingredients
2 each 7-ounce packages of GOYA chocolate Maria cookies OR other chocolate wafers of your choice (homemade or Nabisco Chocolate Wafers, if you can find them!)
2 ½ cups heavy cream
½ cup less 1 tablespoon powdered sugar, sifted
Pinch kosher salt
½ teaspoon ground cinnamon or for the more adventurous palate: ½ teaspoon ground cardamon seed
1 teaspoon vanilla extract
1 to ½ teaspoons instant coffee granules or espresso powder, (If using instant coffee
granules, grind them to a powder with the back of a spoon or use a mortar & pestle.)
Directions
Prepare the loaf pan. Coat a 8.5-inch by 5.5-inch loaf pan lightly with pan spray. Cover the bottom and sides of the pan with plastic wrap, leaving a long overlap on both ‘long’ sides. (Sometimes it is less cumbersome to line the pan with 2 separate pieces of plastic wrap, overlapping them in the bottom of the pan.)
Whip and season the cream. Add the 2 cups of heavy cream to a chilled bowl and add the sifted confectioner’s sugar, the ground cinnamon or cardamon, the salt, the vanilla extract and whip on low speed to combine ingredients. Increase speed to medium and whip until cream has thickened and holds its shape. Don’t over whip or it
could turn to butter-delicious butter, but not usable in this recipe! Cover and refrigerate the whipped cream.
Crush the cookies. To make this task a little less messy: add 1 package of (unwrapped) cookies to a gallon-sized plastic zip-lock bag. Seal the bag. GENTLY
crush the cookies with a rolling pin. Don’t pulverize completely. Aim for an equal mixture of pieces, chunks and crumbles. Empty the bag into a bowl and repeat
procedure with the second package of cookies.
Assemble the cake. Set aside 1/3rd cup of the cookie-crumbles and 1/3rd cup of whipped cream to garnish the finished cake after it has set. (Cover the cookie crumbles and set aside, do not refrigerate. But do cover and refrigerate the whipped cream that
you set aside.
Visually divide the remaining cream and cookie-crumbles into 4 portions. Begin by adding about 3-4 tablespoons of whipped cream to the bottom of the plastic-lined loaf
pan. Smooth out into an even layer, using a small off-set spatula or the back of a spoon. Aim for about ½-inch-even layer of whipped cream.
Next gently spoon the cookie-crumbles on top of the cream. Go slowly, ensuring that the cookie-crumbles sit on top of the cream in an even ½-inch layer. Build 4-5 layers in total, ending with cookie-crumbles. Completely wrap in the plastic and refrigerate for 16-20 hours. The cookies will be absorbed into the cream and create a distinct
chocolate layer as well as a distinct cream layer. Try to chill the cake for at least 15-16 hours so the layers will be firmer, more distinct and easier to slice.
To Serve: Remove +/or fold back the plastic wrap from the top of the loaf pan. Set your serving plate on top of the loaf pan and turn the plate and loaf pan over onto the counter. Gently lift the loaf pan from the cake. Remove all the plastic wrap. Spoon the reserved whipped cream on the top of the cake and garnish the top of the cake with some of the reserved cookie-crumbles.
To serve: Cut into slices, top to bottom, revealing a layered cake.
Serves: Makes 6-8 slices/portions
Prep and Assembly Time: 50-60 minutes
Refrigerator Chill Time: 16-20 hours